Articles
Photos bracketed with the Fuji X100
22/01/2012
I have tried to use the bracket mode while shooting the last series of land/seascape photos and in this article I do explain how I did it.

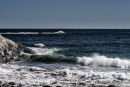
1st shot. F16 at 2.0s. Iso 200.

2nd shot. F16 at 2.5s. Iso 200.

3rd shot. F16 at 1.5s. Iso 200.

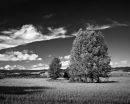
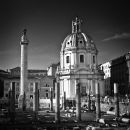
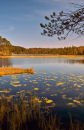
The 3 photos combined through fusion.

The image after processing.

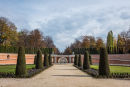
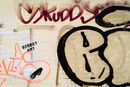
Street example with moving persons

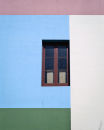
Empty Backstreet
In this article I want to explain how I use the bracket mode to make photos.
In this case I metered the light and chose F16 as aperture and 2.0 seconds as shutter speed. Of course I used a tripod and a ND-filter to make this settings possible.
Then I sat the drive mode to "AE BKT" selecting only 1/3. This was one of the first photos I did in this way, so I was a little shy to select a to high gap between the 3 photos.
From the Exif files, I see that the camera chose a slower shutter speed of 2.5s and a faster speed of 1.5s. So the first one of these bracketed exposures was some lighter than the original setting, the second some darker as you may see on the 2nd and 3rd photo.
The camera shot the 3 photos quite fast. After a little while the screen showed the first photo big and then the 3 photos as thumbnails while saving.
At home then I used Photomatix Pro to combine the 3 photos. It can be opened within LightRoom as a plug-in, or as a stand-alone application. Normally I do the latter because the program allows to set up a batch for merging groups of photos. Because I do a lot of shots in one session, this is the most easy way to merge them. The Fuji X100 do only take 3 photos within a bracket while the program allow up to 17 photos!
For the merging I do only activate the "Fuse exposures with Fusion/Auto" and I "select 3 images at a time". Then I check "Align images" and "Crop aligned images". Further "by matchin features" and "with perspective correction". I let the program put the combined photos under the Source Folder. I save them as TIFF 16-bit.
Then I select "Run" and wait ... my Mac Pro is quite fast so it don't take a long time.
Now I do import the finished photos in LightRoom and do more or less the normal adjustments from my workflow.
A friend of mine who is photographer said to me when he saw my first series of photos produced in this way, that this should give the photos a greater range in color. He thought I have implemented the method in a correct way.
Encouraged of this, I am testing the method further. Recently I did some handheld shooting in this way in the city of Oslo. To get a higher shutter speed I used Iso 1600. But it is impossible to shoot moving objects in this way. If you have a look on the two persons on the first photo from Oslo, you can see the movements caused by the 3 exposures. The second one was an empty backstreet, so it worked there ... I also shot some photos of flying pigeons which ended quite surreal and not useable ...
When shooting long exposures of 15-30 seconds of the sky, the merged photo can get to be quite interesting because the clouds are moving in that time. Not all photos can be used. But when it succeed, I think it give a special depth and interest to the photos.
You may see more examples at the moment under "New Work" and later the photos will be placed in the sub gallery "Sea and Sky" of "Nature".
1st version, 22nd of January 2012